Introduction
At Salesgenie, our goal is to constantly improve our products. We aim to introduce new features and functionality built to help you better manage your team and improve your sales.
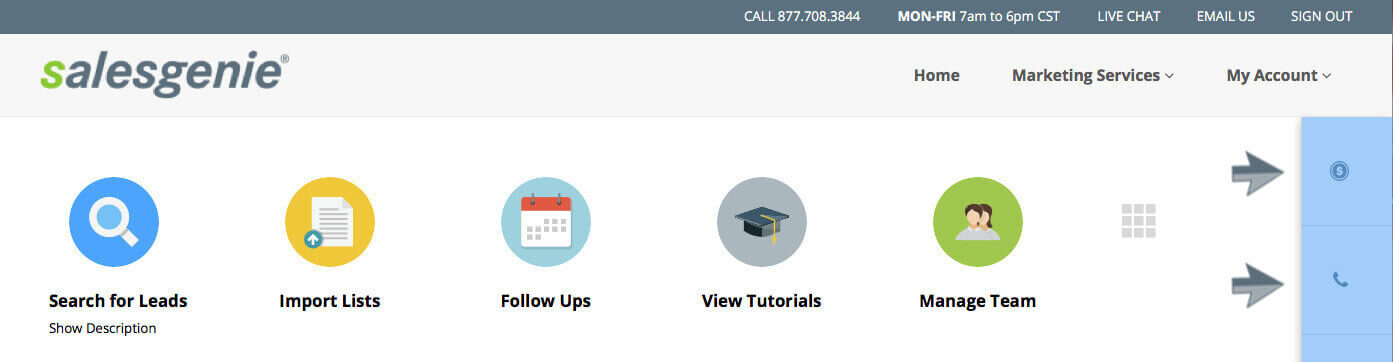
With our latest release of Salesgenie Team, we’ve updated the look of the interface and added new tools including Performance Tracking. The first thing you’ll notice is the clean new layout and design. We’ve made it easier than ever for you to quickly access the tools you need by creating a new Action Bar at the top of the page.
New icons across the top also make it easy to:
- Search for Leads – Build a targeted prospect list by matching custom search criteria
- Import Lists – Enhance, map, send campaigns, or suppress from searches
- Follow Ups – View and edit reminders to follow up with leads
- View Tutorials – Learn how to perform the most common tasks in Salesgenie
- Manage Team – Add or remove team members
- Send Direct Mail – Create and send professional direct mail campaigns
Set Up Your Team
One of the first things you’ll want to do is set up your team. From the Home screen, click on the green “Manage Team” icon. The Manage Team page is where you can add or remove users or reset their password.
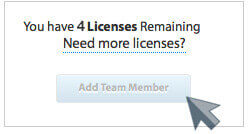 You’ll see the “Licenses” section on the right column with the number of open licenses you have remaining. Click the blue “Add Team Member” button to add your first user.
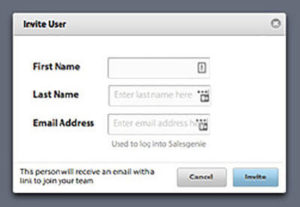 This will open a window where you will type the First Name, Last Name, and Email Address of your team member. When finished, click “Invite” and that person will receive an email with a link to join your team. Repeat this process until you have invited all of your team users. New member status will display as “Pending” until they confirm their account via the email they received. If the user did not receive an email, click the gear icon to the right of their name to resend the invitation email. When finished, click “Home” or the Salesgenie logo to take you to your main dashboard.

Search for Leads/Build Your List
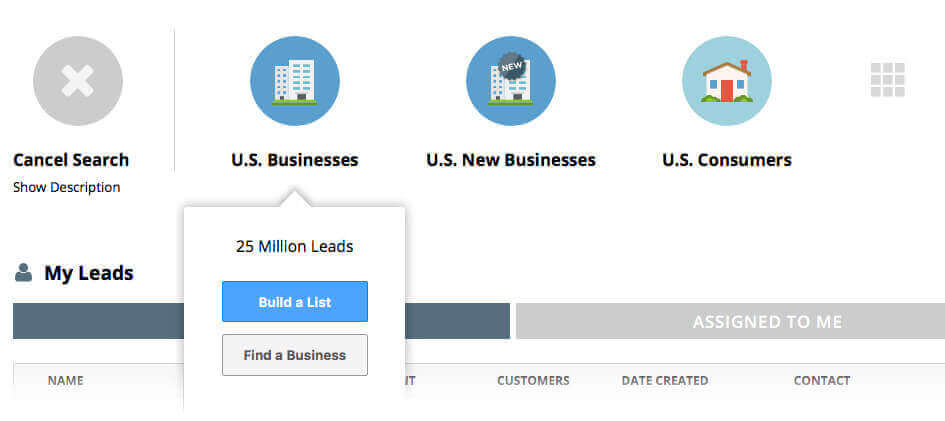
Once your account has been activated, you’ll want to build your lead list. Log into your Salesgenie Team account and click the “Search for Leads” button.
A list of available databases will be shown. Choose a database, and select “Build A List” from the drop down menu to be taken to the standard lead search page.
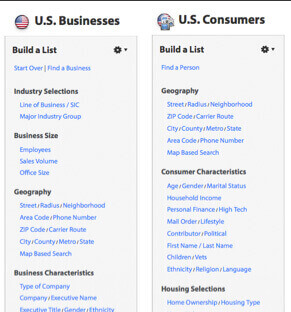 Refine Your List – From here you’ll want to use the left-hand column to add your selection criteria. If you sell to businesses, you’ll see a list of selections including SIC code, employee size, geography, plus dozens more. If you’re marketing to consumers, you have selections like age, income, home value, geography and more.
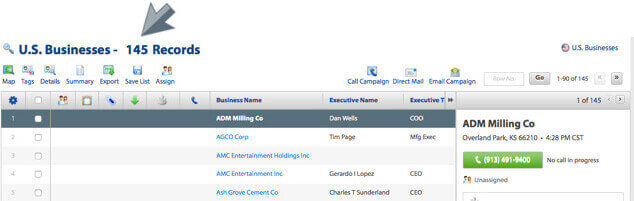
After you make each selection, click “Run Search” to update the count. Do NOT click the “Back” button or you will lose your changes, which will require you to start a new list search. Each time you update your selections, you’ll see the updated number of available records along with a lead preview.
Save List & Assign Leads
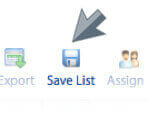
Save – Once you’ve narrowed down your prospects, it’s time to save your list. Click the “Save List” button located near the top menu. We recommend that you choose a name that is somewhat descriptive of the list’s selection criteria/geography.
Please note: the “Save” feature in Team Edition works differently than in the standard edition. In Team Edition, once you save your list and assign any leads, it’s not recommended that you edit the list. Although you are able to edit the list, any activity associated with records that that fall outside the new list criteria will be lost. You do have the ability to filter criteria within a list without losing any activity or notes.
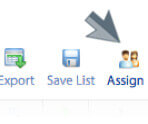
Assign Leads – Click the “Assign” button. A pop-up screen will appear. Choose which leads you’d like to assign.

Split Type – The second drop-down menu gives you the option to choose how to split up the leads. Lists can be assigned using one of four methods. “Custom” allows you to choose exactly how many leads are assigned to each rep. “Fixed” assigns a fixed amount equally. “Even” assigns all leads within that list equally across all selected reps. “Single” allows you to assign leads one at a time.
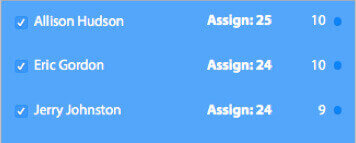
Choose Your Reps. You’ll see your list of sales reps. Check the box next to the rep (s) you’d like to assign leads to. Next to their name, the “Assign: xx” shows you how many new leads they’ll receive. The far right column will display the number of “Open” leads for each rep. If this is the first time assigning leads, the number will be 0.
Add a Message – Below the “Assign Leads” box, you have the option to “Add a Message”. If you choose this option, each rep that is assigned leads will receive a message with each lead assigned.
Tracking and Reporting
Now that the leads are assigned, you can see a summary of the list along with lead assignment and activity. The 2-headed icon shows you that a lead has been assigned. If you hover your mouse over the icon, you’ll see the name of the assigned rep. A blue dot to the left of the lead indicates that lead does not have any activity.
![]() For more detailed reporting, click the Salesgenie logo or the “Home” button in the upper right menu.
For more detailed reporting, click the Salesgenie logo or the “Home” button in the upper right menu.
My Leads
Now from the home page, scroll down to the “My Leads” section. Here you’ll see two tabs: your saved (1) “LISTS” and your lists (2) “ASSIGNED TO ME”. Lists with the most recent activity will be at the top.
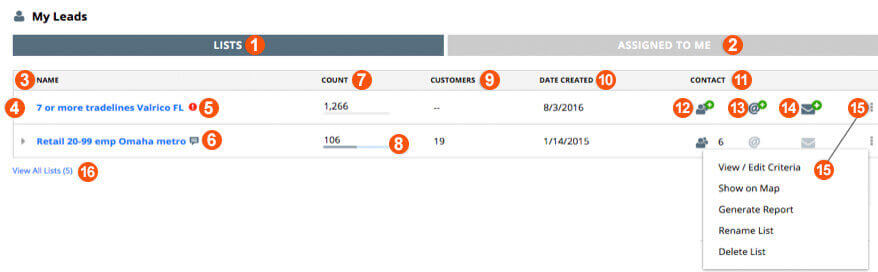
(3) List name
(4) For detailed lead reporting, click the grey triangle on the left.
(5) The red circle with the “!” is an alert to “Assign Leads Now”
(6) Message associated with that list
(7) List count / quantity
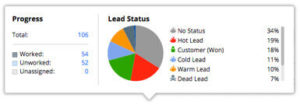
(8) Hover over the progress bar you’ll see a graph with the list’s Progress and Lead Status (left)
(9) Number of customers in the list
(10) Date the list was originally created
(11) Icons below show you leads assigned, along with email and direct mail campaigns sent
(12) Assign leads from this list
(13) Send an email campaign to this list
(14) Send a direct mail campaign to this list
(15) Click on the three grey dots to open a menu allowing you to
- View / edit the list and it’s selection criteria
- Show the list on a map
- Generate a report for this list
- Rename the list
- Delete the list
(16) View all saved lists
Credits & Phone Settings
To view Lead Credits, Email Credits, and Dialer Minutes or Phone Settings, click on the circle with $ icon or the phone icon on the far right panel.
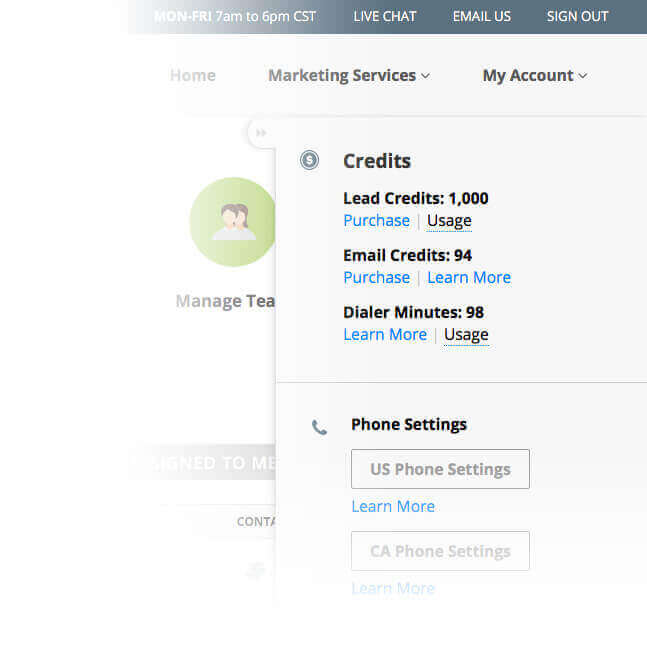
The section will expand with details for Lead Credits, Email Credits, Dialer Minutes, and Phone Settings.
Sales Pipeline
** This section will not have any information until you start to use the product. Once you start working leads or adding customers you will start to see the data within the graph.
The Sales Pipeline graph displays progress by team member or by list. This new feature lets you see data for leads worked or customers won by day, week, month, or quarter. You can hover over a data point to get even more information on Leads Worked, Customers Won, and Lifetime Value.
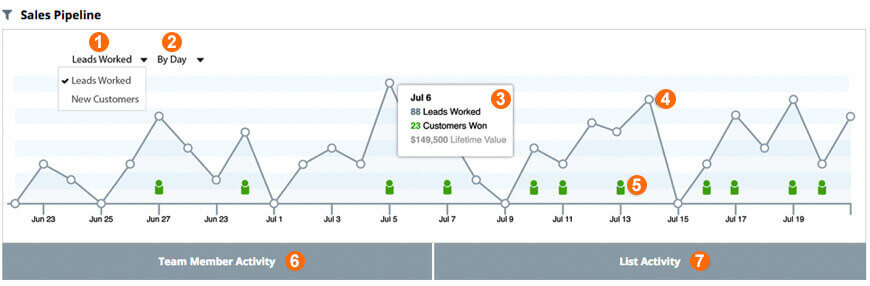
- Choose between Leads Worked or New Customers
- View date range by day, week, month, or quarter
- Hover to see details for that date
- Represents number of leads worked for that date
- Represents new customer acquired for that date
- View summary of Team Member Activity
- View summary of List Activity
Customers
** This section will not have any information until you start to use the product. Once you start adding customers you will see their information below.
Finally, we’ve added a new Customer section. Here you can see a list of recent customers you’ve won. Hover over a customer card, and you can clone more customers like them.
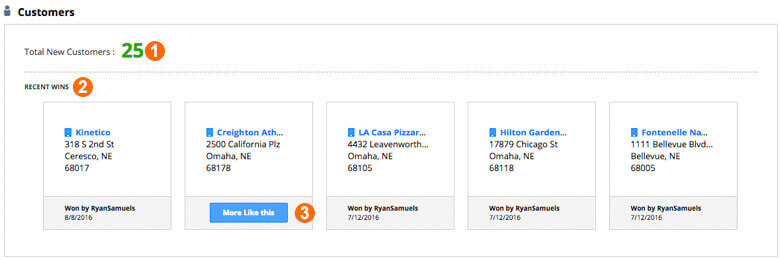
- Total number of new customers added
- Most recent new customers
- Clone and find more customers with the same characteristics